Wednesday 3 March 2010

Compositing


Compositing took place on the final day of the project, so it was pretty rushed. We didnt have time to do many effects, and i felt the most important effects to include were the transitions from one scene to another. Once i had gathered all the scenes i was able to start putting together the scenes, however the first scene was still not rendered on the first day so i preceeded without the first scene, and did the three latter scenes instead. i made sure that they floweed well, after making mistakes with the timing of the animation we had to time stretych most of the image sequences in After Effects to ensure they all flowed through at the right speed that we intended. This compositing was very much so a group thing. We all sat round one computer whilst trying to get the final scene rendered and finished on a computer nearby, whilst we composited this final scene. It was basically a matter of adding all the image sequences/exported movies/solid layers into after effects and then pacing them and adding a few simple effects which we had time for. I would have loved to have the opportunity to include more effects, like misting effects, and grading the scene too. Also there was a great opportunity to add fire into the scene for the torches, as the particle maya fires were not used in the playblast we included in the final composition. Overall i was fairly disappointed with the outcome of the project once it was composited, all that effort we had put ihnto it, and i felt somewhat like we had fallen at the last hurdel aqfter it was all looking so optimistic all week. I knew we were cutting it short to get it finished, and i knew that we would have been lucky to get it finished at all with all the problems we had run into, but i was still overwhelmed with a sense of dissappointment that i couldnt really explain. We have already decided as a group that we need to meet up after the deadliner has passed just to polish the whole thing up, re-render some scenes and finish the project to a standard we would be proud of, rather than to a standard that fulfils the assesment criteria layed out.

Helping out- Lighting

We found ourselves cramming in lighting/animating/rendering into the last week which caused huge problems, the whole team were behind and because of this, people with a heavier workload at the beginning found themselves havving to help share the workload of latter tasks just to get the prject finished to some reasonable extent. Because of this i offered to help light the futuristic church for Depa so that her and Guy could get on with animating one of the other scenes. I think this is where we really found out about the bonds in our team being strong. We were able to ask freely and easilty anybody else in the team to help out with a certain task if were for some reason behind without fear of backlash, and every time without fail we were able to help out to get the job done in time.

I had no previous knowledge of lighting however and i just started to mess around with spolights in the original scene file and reverted back to the render view to see how well the lights worked. Below are a selection of screen shots showing my progress of lighting to try to get the perfect lighting. I was aiming for a glow light on the pillars to illuminate the sides of the scenes and maybe to add a little light on the top walls creating contrast throughout the scene. However i felt it was important that we added a touch of reflection in the scene just to emphasise the materials and the translucent flooring within the futuristic scene. I played around with the lights until i was happy with the flooring and the side lighting. I found that the reflection on the floor only showed up in Mental ray rather than maya software, which did not matter too much as we could render this scene in a higher quality without too many problems as it was only a small scene with a relative low poly count, and my laptop managed to render it fully and efficiently in a few hours.

CLICK TO ENGLARGE IMAGES

Original view in maya


Original glow Depa had put on side pillars and floor this is where i took the scene over from in terms of lighting.


Sorted out the floor and removed a couple of lights so the light flare wasnt as intense on the floor. The floor now looked translucent again.


Made sure lit areas of scene reflected light on other areas for exaple the cross emmited light on to back walls, enhancing realism.


Reduced the glow intensity of the pillars on one side to see which looked better, i asked my team mates and we all agreed that less glow looked better. Also reduced the size of the mesh of the pillars so they didnt go underneath the floor, but now only rested on top of the floor.

Tuesday 2 March 2010

Problems...Solutions...Outcomes...What did i learn?


This section of my blog i am going to focus upon the problems we faced as a group and how we went about solving and if we went about solving them properly, and in turn whether i learned anything by my experiences.

One of the initial problems we came accross was the bad weather and snow in the first 2 weeks of term which hindered our group progress. The tutors argued that we could have still been getting on with the project at home, but it wasnt the same without direct contact with eachother. We were still able to talk over MSN and via phone, hoever it isnt the same when we are all in college helping eachother out whenever we needed it. I was quite confused to find out that we werent going to be given any sort of extension for the project, as in theory we only really had 7 weeks of time to produce the finished outcome if you take into account the bad weather which is a rediculous demand to make whilst having another term long project on the side, and having to worry about a PPD and contecxtual essay until 2 days before they were handed in. I know that this wasnt the case for just our group, and it was for everybody, but i do feel that if we had that extra weekend of solid work, we would have been able to get the project done to the standard we would have liked and it is pretty stupid to sacrifice the final quality outcome of the work for a couple of days where the work is sitting there and not even being marked. But that is just my opinion. Taking a different perspective though, maybe this will enlighten us to time management in the future and having to quickly and effciently re arrainge our schedules if something as random as bad weather comes up when we are working in industry.

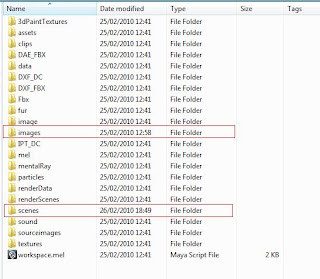
One of the most frustrating problems we came accross as a group, and more specifically one that i found most challenging to overcome was the project folder issue that came up at the beginning of the last week. This problem threatened to jeapordise the whole outcome of our project if we didnt get it fixed fast, as we couldnt progress on to animating lighting or rendering if we didnt first pass this hurdle. We found ourselves having problems transferring scene files from one persons computer to another without having to re assign the textures every time. And even after we thought we had solved this project by re setting the project to the correct destination and then re assigning the textures to the correct destination the textures were not showing up. This took me and Guy 6 hours of frustration to work out, after having talked to Dan Dali, who suggested making anew project, and copying the old scene file data and old texture file data over to the new project, as this would eliminate any Preference confusion in Maya. Thankfully this worked, However it didnt work every time we tried it from then on and we found ourselves regularly having to re assign textures to their correct destinations which was in truth very very annoying.
Another problem we ran into was rendering. We left it till the final day to render one of our scenes which was stupidity at its highest. We were warned many times by Jared and Alex not to do this but we fell into the trap and there arent really any excuses for doing so, we didnt even get a test render done until the penultimate day which again was a stupid idea. The main problem with rendering was too much data in one of our scenes, the textures on the outdoor scene were too large and the poly count on the outdoor scene was far too high too. Clym helped with tidying up the scene on the final day of the project, and allowed us to get a 1 shot render time down from nearly 2 minutes to 27 seconds which was brilliant, and we were very thankful he was there to help us out on that otherwise we would have been stuck. Also we had mysterious problems cropping up with rendering the outdoor scene which started to frustrate me and Steve. The church wasnt showing up in the render view on Maya software, it was showing up as a blank black screen and test renders showed it to only be rendering out a blank black screen too, which was very strange. We found a solution which allowed the scene to show up in the render view, but only whilst using Mental ray which was annoying, as this increased the render time for each frame. In the end we ran out fo time to render the final scene, and we had to include it as a playblast in the overall compositied movie which was dissapointing to say the least after all the effort the team put into it.

One thing i think myself and the rest of my group will agree with is the importance of communication throughout the team. In my opinion this is vital to the smooth running of things right through the begigining stages of the process, right up until the end where all the work is handed in. I feel strongly that it is important to keep in touch at all stages of design to keep continuity, i also feel it is important to air issues we have with nthings within the group, sometimes if we are confronted with a problem, calling a group meeting and talking ti over until it is resolved can be the only way to deal with things, as it was in teh case of the skull debate. I feel i have learned a lot since the start of this project, not only the technical aspects in dealing with Maya, like UV mapping, texturing, modelling, and lighting, but also moral issues like how to deal with other people within a team and how to respond if things go wrong. All in all i have mixed emotions about this project's outcome... i am somewhat dissappointed with the final movie, however there is definitly room and time to go back and improve upon that outside of class time. I am very pleased with some things too, such as now having the confidence to go on and learn about maya more deeply. I honestly feel that this term has taught me about 90% of the information i know since starting this course, that is how much it has allowed me to develop on a technical level.

SKULL DEBATE...


The skull debate is one of the big talking points during the concept stages of our design. It first came around when Depa, our director come up with the idea that we should somehow incorporate skulls into some of the props within the church, for example on the candle sticks and on the altar. This split the group in terms of choice. Me and guy and Steve were probably the most opposed to it, and we had our reasons, where as Depa was probably most for the idea. Personally, I didn’t like the idea as soon as I heard it plain and simply because I wanted to keep the church realistic looking and ‘fresh’, and I knew from past experience and research that skulls weren’t generally used in the religion of Christianity inside the church. However saying that, my decision was not at all based on religious views, in fact none of us in our group are particularly religious which is quite strange as we are making a church, however I look upon that as a positive as it can be advantageous that none of us are going to have any tinted views on certain aspects of the design process, and we aren’t vulnerable to letting our beliefs interfere with what we decide upon during any stage of the production. it was purely down to the fact that I wanted the church to be realistic. I had the strong opinion that if we had decided that we weren’t going down the route of having a gothic church, we shouldn’t have skulls anywhere as there would be no point of having one feature related to that style of design, and no others, and it would just look out of place and awkward within the overall design of the church. This was the same opinion raised by Guy. On the other hand Depa had the opinion that they would look good on the altar, I think she was coming from a purely aesthetic view point rather than contextual viewpoint, and this is why she wanted to incorporate them, and to be fair to her, she did extensive research on them, and I could see her point of view, and she very nearly won me over as she showed me lots of pictures of skulls within churches, and they didn’t necessarily look out of place in all cases, and one church in particular was made entirely of bones. We eventually come round to a decision that we weren’t going to use skulls within the church, but a week or so later, Jared called us over and spoke to us about how we were getting on, and the skulls were again mentioned, and he got in on the debate, saying that he only suggested the idea of the skulls to Depa in the first place, as a way of broadening our horizons and giving us another viewpoint of how the design concept process can happen. I respect the way he did that, as it definitely gave us something to think about. Reflecting back, maybe we were all looking too narrowly minded, and seeing a church and trying to copy it as best we could, rather than take inspiration from other people and other viewpoints. I think this definitely gave me personally a wake up call in terms of research and development of ideas…

COMPOSITING THE SCENES

Putting together the scenes was the next stage after collecting everybodys models, this job fell to me and Guy, at first we had no trouble in doing this, however as it progressed we had problems with textures showing up on eachothers scene files, and we had to ensure all scenes and textures were in correct project folders and were set to the correct project. The job consisted of importing everbodys scene data into one scene and this made the master scene very laggy at times, ans we found it a little easier to put together and work with if we turned hardware shading off. We found it vital as a group to follow the floor plan designed by Steve in the first stages of design, to stick with a sense of continuity throughout the project. I found myself adding more and mroe to the outside scene as we went on. Steve had moddeled a fence and a sky and clouds which were both awesome, but due to them being a very high poly cound and very demanding in terms of rendering both had to be left out in the end otherwise Maya would just roll over and die every 10 minutes. Guy took the job of putting together the indie of the church together, where as i was putting the outside of the church together, we felt it was logical to stick witht he scenes we had previously been UV mapping and texturing however we both found eachother helping out on the opposites scene files if we were finding it hard or having problems of any sort, which was nice. I found it quite comforting that in our group if anybody had a problem, nomatter how big it was, we were able to talk to sombody and resolve it quickly and easily.

Placing the windows in the correct spots.


Lining up/scaling pews to fit in indise church.


Church before ground plane added


Church file as it was given to me to put together


Church put together lacking windows.


Aligingin the symetry of the inside church

KEEPING IDEAS ALIGNED

Just a little update, and i was reflecting on how important keeping textures and colours is imporant. This is one of the main reasons why me and Guy decided to split the UV/TEXTURING jobs the way we did, inside and outside rather than texturing half of the outside each and half of the inside each. The way we approached this seemed the logical way, otherwise we would get awkward looking textures which dont nescessarily fit in with eachother working on the same project, and potentially making the environment look bad.
This is not only the case for UV mapping and texturing, but also for modelling if i think about it. This is why i feel we have done very well up until now on the group blog, with sharing our ideas so that we can all think along the same design lines and keep our ideas in sync with eachother, Hopefully this continues.

TEXTURING


Above is a selection of images i gained inspiration from for the colour and mood of each of my models. I went out to a local church with Guy and Steve, and we found some excellent textures which are now going to be pt to use on my concept designs.


I found texturing fun, it allowed me to go out and get photographs of the materials i wanted to work with, and apply them to something visual on a computer screen, and this i really liked the sound of. Me, Guy and Steve decided to go out and get texture samples from a nearby church, in Chizelhurst highstreet, however this was all very well for most of the textures, although the brickwork on this particular church was white stone, so i had to get my own independent textures from a church nearby to my house in Bexley after consulting my team mates, which suited the colour scheme Steve had drawn up in his concept work far better.

Below are the the applied texture outcomes to the objects i was asked to texture. The modells below are obviously not all mine, but the textures on the images are mine. For a first try, i am exteremely happy with the outcome of my texturing work, however i do feel i could have encorporated bump mapping into my teturing, to give it a added realism, howvwer i didnt manage to learn bump mapping to an extent i was happy with to include it in my work, so i opted to leave it out for this project, however i will certainly look to use it in future project if the opportuinity arises. There are a couple of textures i am especiually happy with, one being the small church window, i think that come out very well, and also the futurisitc swirling altar in my opinion looks nice and fits in well to the churches futruristic theme.

The main texture part i was working on was the outside of the church and all its surroundings, over all i was fairly pleased with the aesthetic outcome of the church, i felt it aligned well with Steve's initial concept drawings and i think it come out just as intended. One thing i am fairly unhappy with as far as texturing goes, is the grass. if i had more time, that is definitly what i would focus on. The grass is the main aethetic disappointment in my opinion. I just feel that it is overall too light and too flat.I know for a fact that if i had more time i would have added a lot more detail and areas of interest into it to give it all an over all more realisitc feel. I think the graveyard looks fairly fake, and needs a lot more detail, in terms of grassed areas and muddy areas, like i was talking about in my research stages of development.

I feel i used the texturing stage as a part of my design stage in the project which i dont think i will do in projects in the future. I think i relied too heavily on the outcome of the textures i found to influence my design ideas, rather than relying on my design ideas and then going out to find appropriate textures. I think over all far too much of my colour design work was interpreted by the textures i found, and i dindt spend nearly long enough doing colour studies beforehand. However saying this i dont think it worked to my disadvantage working this way round, as concept work is no where near my strongest area of work, and using textures and real visual influence as starting points like i did so in my textures is a good way of getting added realism rather than just designing concepts from mind and trying to find textures to match.


UV MAPPING


When first starting the project, i told myself i wanted to try and stretch myself outside of my comfort zone, and doing so i had to try new things. I had never previously UV mapped, nor had Guy, who i was doing it with. Uv mapping is an important part in the overall aesthetics of the project, and if we messed it up, it would show up like a sore thumb on the textures we placed afterwards, so it was quite importatnt that as first timers to it we got it right...
We both were keen to learn to learn this practice, as we thought it would be useful not only in this project, but in other projects too. The first thing we did was go to Alex Hulse, who recommended a few DVDs in the LRC for us to watch, and he took us there and pointed out which were the best to watch. We rented them out and watched them, the Dvd was called UV mapping 101 and it gave very basic details on beginners UV mapping, and how to lay simple planar maps as well as other types of UV map. I followed the tutorials given, and to my surprise it did not take very long for me to pick up how to UV map to give the desired effect i was looking for. However, i made the mostake of trying to learn UV mapping b7y myself previously to this, just messing around in maya trying to figure it out, and i do kind of regret doing so, as it must have wasted a good couple of days of time i could have been practicing UV mapping the proper way. Once i got the hang of UV mapping i started to apply it to some of the objectsi had moddelled. I found that i had a breif gap in between the time i had finished modelling my props, and the time i was waitingt around for other people to finish and give their models to me so that i could put the scene together, so i found myself sitting around quite often with nothing to do, other than the alternative project. However Jared enlightened me as to the fact that i could be sitting there UV mapping all of my props whilst waiting for other members of the group to catch up. I took his advice up, and started working on the UV mapping and it didnt take me very long to map most of my props. I was using simple Planar maps, selecting the faces of my objects that i wanted, and then applying the planar map along the correct axis. Most of my objects required UV mapping on 2 axis, and this wasnt a real problem for me to do, as i enjoyed doing this. Below are a few images of the process i went through to uV map the altar, I used planar mapping to do this to the front view of the altar, then turned the altar round and mapped the side faces of the altar, so that the texture looked as realistic as it could without having too much stretch. I foudn that i got to grips with the UV editor fairly fast too, sometimes it was just a case of rotating the UVs, so that the texture looked in shape, and sometimes it was a case of selecting certain UVs and using the move and scale tools toget desired effects on then texture surface. One of my favourite pieces was the small church window which i UV mapped. I sleected just the glass faces in the UV editor and scaled the UVS to match up with a stained glass texture, whilst the rest of the object matched a granite texture i had placed to give it a rocky texture.